Imagine slicing through a half-inch of solid hardwood as easily as a hot knife sliding through butter. That is the reality of a 100 watt laser—the exact point where a weekend hobbyist’s tool transforms into a professional powerhouse. A standard presentation laser pointer uses about 0.005 watts of energy to cast a red dot on a white screen. Scaling up to 100 watts means wielding a beam that is 20,000 times more powerful. It is not just pointing at a surface anymore; it is instantly vaporizing the material underneath. Choose the best 100 watt laser igniter.
Think of this wattage-to-capability ratio like upgrading a standard garden hose to a heavy-duty pressure washer. A regular hose gently wets your driveway, much like a low-wattage craft laser gently scorches the top layer of a piece of leather. However, a high-PSI pressure washer forcefully strips away years of grime in a single, fast pass. Concentrating a high volume of light energy into a pin-sized dot operates on the same principle, delivering enough industrial power to punch right through dense materials instead of just warming them up.
Many makers start their manufacturing journey wrestling with the limitations of smaller, lower-power units. You might have tried cutting thick acrylic on a beginner machine, only to end up with melted, fused edges after running the job painfully slow. Industry data reveals that crossing the 100-watt mark is the established “professional threshold” where laser speed finally meets true efficiency. At this tier, a small business can process complex jobs in minutes rather than hours, leaving finished edges that look as smooth as glass.
In practice, the reliability of a laser igniter at this scale dictates how smoothly you can transition from simple surface engraving to heavy-duty material processing. This component acts as the critical spark, properly triggering and sustaining the massive high-voltage gas reaction required to fire the beam consistently. Once properly fired, makers can rapidly fabricate custom cabinetry parts or slice intricate, layered signage without ever needing to rely on traditional, messy saws.
Evaluating this massive leap in capability determines if a workshop is ready to graduate from casual crafting to high-output creation. High-wattage systems transform garage ambition into genuine manufacturing muscle by applying industrial power to real-world projects.
Why the Jump to 100 Watts Changes Everything for Your Workshop
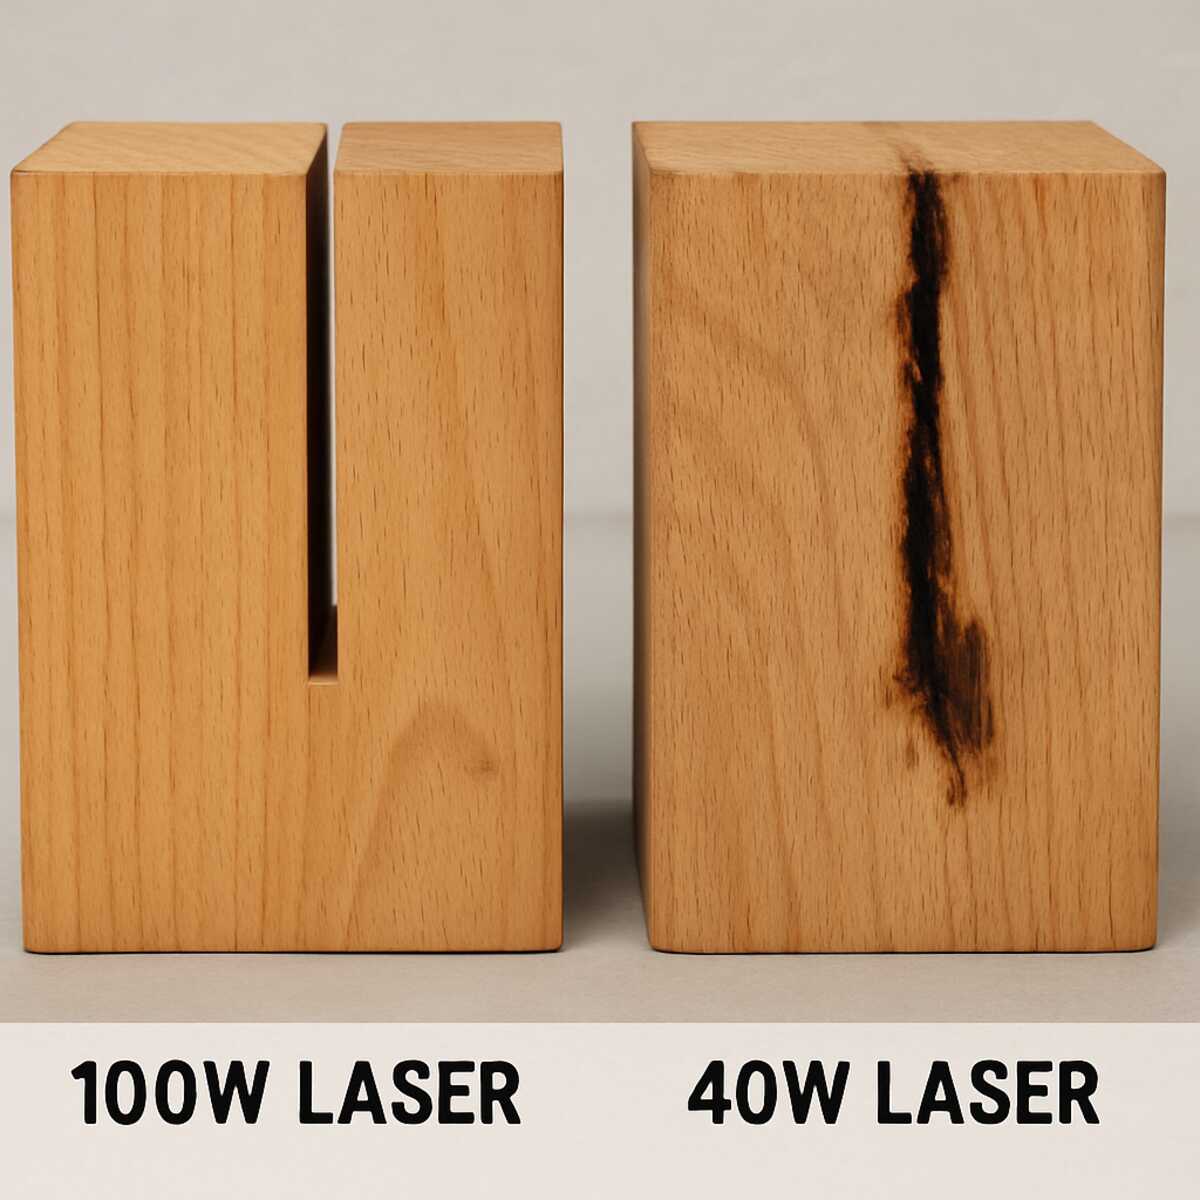
Stepping up to a 100 watt laser transforms a weekend hobby into a production powerhouse. You already know that more watts mean more power, but the real magic happens in how that energy interacts with your workpiece. Instead of slowly burning through wood, a 100W beam instantly turns solid matter into gas—a process called material vaporization. Because it flashes through material so quickly, it effortlessly slices through half-inch plywood that would choke a consumer-grade desktop machine, saving you hours on high-volume Etsy orders.
To see the practical impact, consider how different machines handle standard 1/4-inch birch. When you consult a standard cutting speed and power settings chart, the real-world differences become obvious:
- 40W Unit: Requires slow, multiple passes and typically maxes out at cleanly cutting 1/8-inch thickness.
- 60W Unit: Manages 1/4-inch wood but must move slowly, leaving dark, heavily charred edges.
- 100W Unit: Zips through 1/4-inch material in a single, rapid pass, leaving beautiful, golden-brown edges.
That pristine finish happens because higher cutting speeds minimize the Heat Affected Zone (HAZ)—the area around your cut that gets scorched or melted by lingering heat. When you slice through quickly, the heat simply doesn’t have time to spread into the surrounding wood, drastically reducing charring. Mastering this precise balance of heat and speed guarantees professional workshop results, much like mastering the ‘igniter’ function in industrial combustion ensures a clean, perfectly timed burn on a massive scale.
Mastering the ‘Igniter’ Function in Industrial Combustion
You probably know how a standard car engine starts: a metal spark plug creates an electrical arc to ignite the fuel. In aerospace and advanced automotive research, engineers are replacing those physical plugs with a 100 watt laser igniter. By focusing intense light into the combustion chamber, the laser superheats the fuel mixture until it snaps into a tiny, explosive spark of charged gas called plasma. Because the delicate laser equipment sits safely outside the volatile chamber and beams light through a protective window, this setup is known as remote ignition.
Consistently catching that fuel on fire requires an instantaneous punch of power known as pulse energy. If the beam is too weak, the light simply scatters and the engine misfires. Researchers found that a 100W system provides the necessary minimum energy to reliably flash that gas into plasma every single time. It works just like a magnifying glass focusing sunlight onto a dry leaf, but the reaction happens in a fraction of a millisecond.
Beyond just starting the engine, this remote setup solves a major maintenance headache. Traditional spark plugs sit directly inside the blast zone, meaning their metal parts slowly burn away. A laser igniter, shielded from the physical explosion, suffers zero wear and tear, radically extending its lifespan. While you might not fire up rocket engines in your driveway, that same concentrated 100W energy that vaporizes aerospace fuel can tackle your toughest workshop projects, including slicing through dense 20mm hardwoods.
Slicing Through 20mm Wood: Real-World Thickness Limits
Pushing a 100-watt laser to its limits means entering the 18mm to 20mm (about 3/4 inch) “safe zone” for wood. Beginners often assume that if one pass doesn’t punch through, running it repeatedly will work. This strategy usually backfires because of kerf loss—the tiny amount of material vaporized to create the cut’s actual width. As the beam sinks deeper over multiple passes, it loses focus and scorches the edges. To maximize your CO2 laser engraver cutting thickness, you want to rely on one slow, perfectly focused pass.
Not all material handles this intense light equally. The maximum plywood thickness for laser cutting heavily depends on what hides inside the boards. Cheaper wood contains hidden voids filled with internal glue pockets. Because lasers react poorly to dense adhesives, hitting these pockets instantly stops the cut and ruins the project. Expect the following limits under 100W:
- Soft Plywood: Up to 20mm (requires high-grade, laser-safe inner cores)
- Solid Oak: Up to 15mm (hardwoods require slower speeds)
- MDF: Up to 12mm (dense glue content strictly limits depth)
Clearing the path for that beam is essential for success. To achieve these depths without starting a fire, high-pressure air assist must blast away smoke before it absorbs the light. While wood dominates the CO2 tube’s workload, cutting metal requires an entirely different approach and technology.
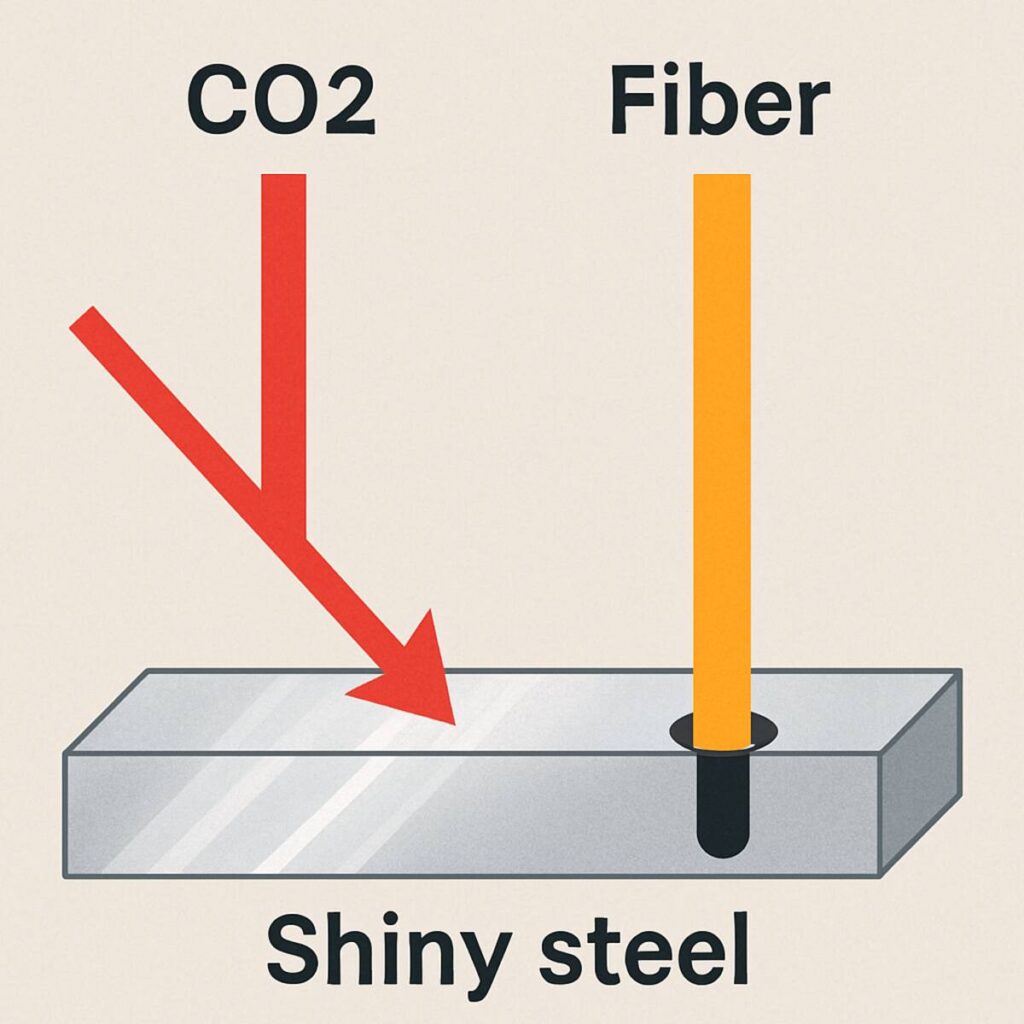
Fiber vs. CO2: Which 100W Powerhouse Fits Your Goals?
Stepping up to a 100 watt laser forces a crucial decision: are you working with organics or metals? The answer dictates whether you need a CO2 or a Fiber machine. Think of these lasers like radios broadcasting on completely different frequencies, known as their wavelength. A CO2 laser broadcasts on a frequency that wood, leather, and acrylic absorb perfectly. However, if you point that exact same CO2 beam at raw steel, the surface acts like a mirror, simply reflecting the energy away instead of cutting it.
To conquer metals, you need a different frequency entirely. Fiber lasers generate a much shorter wavelength that raw steel, brass, and aluminum eagerly absorb rather than reflect. This specific material absorption rate makes fiber laser marking vs CO2 engraving a fundamentally different process. While a CO2 tube is massive and fragile, a fiber setup is remarkably compact and durable. Because they use advanced fiber-optic cables, they cost significantly more per watt, but they can effortlessly engrave deep serial numbers into raw steel or bleach anodized aluminum to create brilliant white graphics.
Choosing between these two technologies ultimately comes down to your primary canvas. Whether you invest in the wood-slicing dominance of CO2 or the metal-carving precision of fiber, both machines generate an immense amount of internal heat to produce their respective beams. Safely managing that trapped thermal energy requires strict adherence to industrial cooling protocols.
The Cooling Commandment: Why Industrial Water Chillers Are Mandatory
Generating 100 watts of cutting power produces enough waste heat to boil your cooling water. Beginners often rely on a cheap pump in a bucket of ice water, but that gamble fails here. Meeting strict industrial water chiller requirements is non-negotiable. You need active refrigerant chilling that uses a compressor to continuously pull heat away.
The secret to protecting your investment is maintaining a temperature sweet spot between 18°C and 22°C (64°F to 71°F). When makers ask how long does a gas laser tube last, the answer heavily depends on this precise climate control. Letting the tube run hot degrades its internal gases, slashing its expected lifespan from 10,000 hours to mere months.
Sudden temperature swings are actually deadlier than gradual overheating. If your glass tube gets excessively hot and a rush of freezing water hits it, the glass experiences thermal shock. This rapid flexing creates invisible micro-cracks along the casing, which is the most common cause of sudden tube failure.
You must also avoid over-cooling the system, which introduces a stealthy threat called dew point condensation. When the tube becomes colder than the surrounding room, moisture sweats onto the glass and creates a massive high-voltage electrical hazard. Once your cooling ecosystem is properly balanced, you can safely direct that energy through the digital controller.
Ruida Controller Setup: The Brain Behind the 100W Beam
Think of the Ruida controller as the air traffic control tower for your laser. A proper Ruida controller setup guide starts with reliable communication. Connecting your machine directly to your PC via an Ethernet cable unlocks file transfer speeds ten times faster than a standard USB connection. This robust networking foundation maximizes LightBurn software compatibility and features, letting you send massive engraving files instantly without risking the mid-job data drops that can ruin expensive materials.
Opening the machine’s “Vendor Settings” introduces you to the system’s factory guardrails. These critical software boundaries protect your hardware by preventing the motors from violently crashing into the metal frame during a job (known as over-travel). Once those limits are secure, you must perform an axis calibration. Out of the box, commanding the laser to cut a 100mm square might yield a 98mm rectangle because the belts and motors are not perfectly synchronized. You fix this discrepancy by adjusting the pulse equivalence—a setting that tells the controller exactly how many electronic motor “steps” equal one physical millimeter.
Dialing in this digital precision combines your PC networking with physical testing:
- Assign a static IP address on the Ruida display to ensure a consistent connection.
- Cut a 100mm test square out of scrap material.
- Measure that physical shape accurately using digital calipers.
- Input both your expected and actual measurements into LightBurn to automatically calculate the correct pulse equivalence.
With the controller perfectly synchronized to your workspace, you must physically align the light path to ensure maximum cutting power.
Precision Alignment: The ‘Pool Table’ Guide to Laser Mirrors
Bouncing a laser beam across a machine is like lining up a trick shot on a pool table. If your initial angle is off, the physical error multiplies due to beam divergence—where the concentrated light naturally spreads out over distance. You save hours of frustrating calibration simply by ensuring the laser tube perfectly hits the dead-center of the first mirror before adjusting anything else.
To keep the light traveling perfectly straight, you must perform the “Near-Far” test, which is the core secret of how to align laser mirrors correctly. Fire a test pulse onto masking tape over the second mirror when pushed close, then again when pulled far away. If those two burn marks do not overlap perfectly, your beam lacks parallelism. You must adjust the first mirror until both pulses hit the exact same mirror center-point, guaranteeing the beam remains perfectly aligned no matter where the mechanical arm moves.
The final hurdle happens at the laser head, where the third mirror bends the light straight down. If you cut thick wood and notice slanted edges, a tilted third mirror is the culprit. Fixing this downward angle is also crucial for troubleshooting weak laser beam output, because an off-center beam hits the inside of the metal nozzle and loses power. With a perfectly aligned path, we now need to protect the final piece of glass, making a strict lens cleaning routine essential for preserving equipment.
Why Your Lens Cleaning Routine Saves You $500 a Year
Hidden inside your laser’s nozzle sits the focal lens, concentrating that 100 watts of power into a microscopic point. When vaporizing materials, sticky residue inevitably drafts upward onto this glass. The beam hits that dirt and instantly heats it up—a destructive process called “thermal blooming.” Trapped heat scorches the anti-reflective coating or cracks the glass completely. Keeping this pristine is critical when setting your focal length for deep engraving, where maximum power delivery is non-negotiable.
Establishing a strict schedule for cleaning laser focal lenses and mirrors prevents these costly meltdowns. Cut heavy smoke-producers like wood, and you must clean daily; for cleaner cast acrylic, weekly suffices. To preserve lens coating integrity, always use the ‘Circular Wipe’ technique. Simply swipe from the center outward in a gentle spiral to avoid dragging sharp debris across the surface. Keep a maintenance kit nearby containing:
- An air bulb (for blowing away loose dust)
- Optical-grade lens tissue (never paper towels)
- 99% Isopropyl alcohol (evaporates without water spots)
A ruined premium lens costs around $100 to replace, meaning a quick daily wipedown easily saves you $500 a year. Yet, the absolute best way to keep your glass clean is to stop debris from ever reaching it. That requires mastering your airflow to rapidly evacuate destructive smoke.
Ventilation Secrets: Managing the Smoke of a 100W Beast
Vaporizing thick wood at 100 watts creates blinding smoke that quickly ruins your machine if trapped inside. To pull that destructive cloud away from your fragile lens, you must establish “negative pressure”—a constant vacuum effect inside the cabinet. We measure this pulling power in CFM, or Cubic Feet per Minute. While a standard bathroom exhaust moves roughly 50 CFM, effectively clearing heavy smog from high-power cuts requires a fan rated for at least 400 CFM.
Selecting the right blower for your laser exhaust system ventilation comes down to balancing noise against raw power. “Inline” fans are beautifully quiet and popular for home garages, but they often struggle to push thick air through long, curvy hoses. Conversely, “centrifugal” blowers resemble a snail shell and act like industrial shop vacuums. Though significantly louder, centrifugal fans generate the brute-force pressure necessary to aggressively launch heavy wood resins and noxious acrylic fumes safely outside your workspace.
Even the strongest centrifugal blower wastes energy if your machine’s interior isn’t sealed correctly. One of the greatest hidden honeycomb working table benefits is that its metal grid allows smoke to be pulled straight down away from your material—but only if you tape off the empty perimeter gap around it. Blocking this bypass forces all suction directly through the grid, improving clearance by 30 percent without buying bigger equipment. With perfect airflow secured, your physical setup is ready to be fully automated by advanced control software.
LightBurn Mastery: Software Features That Unlock 100W Potential
Harnessing 100 watts of raw power without smart software is like driving a sports car in first gear. To prevent scorching or failed cuts on thick wood, your best tool is a personalized cutting speed and power settings chart saved directly in your materials library. Instead of guessing the juice needed for half-inch plywood daily, one click loads your proven recipe, instantly eliminating expensive material waste.
Beyond basic memory, LightBurn software compatibility and features offer advanced tools that polish your final product. Top 5 LightBurn features for 100W users:
- Kerf Offset: Automatically resizes designs to compensate for the exact width of the laser’s cut, guaranteeing tight-fitting puzzle joints.
- Lead-ins: Fires the beam slightly outside your actual design line, preventing ugly “entry hole” blemishes on high-quality acrylic cuts.
- Power Ramping: Automatically lowers the laser’s output as the laser head slows down at sharp corners to prevent deep edge burns.
- Pass Counts: Automates multiple traces so you can slice through ultra-thick materials cleanly without moving the wood.
- Perforation Mode: Pulses the beam at set intervals to create easy-to-fold creases in cardboard or thin stock.
Even with these automated settings perfectly dialed in, you might notice your once-unstoppable machine suddenly struggling to cut through familiar stock. When digital instructions are flawless but physical performance drops, the underlying issue is typically mechanical or electrical rather than software-based.
Troubleshooting the ‘Weak Beam’ Mystery
When troubleshooting weak laser beam output, first separate gradual “beam fade” from sudden power loss. If cuts weaken over a thirty-minute session, you are likely fighting a cooling issue where trapped heat warps your beam. Conversely, a sudden failure to pierce materials is usually electrical. Because you already understand standard wattage, think of milliamperage (mA) as the actual water pressure pushing through your laser’s engine. Reading a simple analog milliammeter instantly reveals if your power supply is sending the correct electrical pressure to the tube, eliminating hours of guesswork.
Diagnosing the physical health of your glass tube requires only your eyes. A frequent question from new operators is how long does a gas laser tube last, and the answer is usually written in light. A healthy 100-watt tube’s internal plasma radiates a vibrant pinkish-purple hue. As the reactive gasses slowly escape over thousands of working hours, that brilliant purple dilutes into a pale white. If your milliammeter shows perfect electrical flow but your tube glows like a dull fluorescent bulb, your power supply is fine, but the glass tube is dead.
Before buying replacement parts, always verify your optical path is completely clean. A flawless purple tube will still perform poorly if the light must fight through microscopic smoke residue on your focal lens. Routine cleaning keeps your machine running profitably. With your hardware humming perfectly, you can accurately evaluate the return on investment for upgrading to a 100-watt system.
The ROI of 100 Watts: Is it the Best Choice for Your Small Business?
Stepping up to a 100 watt laser often means a $3,000 price jump, demanding a solid business justification for the investment. For entrepreneurs, the answer is “throughput”—a practical measure of how many finished items you can produce in an hour. This upgraded power effortlessly cuts detailed architectural models and leaves glass-smooth edges on thick acrylic signage. By unlocking these high-margin projects, the larger machine turns hours of frustrating labor into minutes of profitable production.
When researching the best CNC engravers for small businesses, looking past the initial price tag reveals your true cost-per-hour. Comparing a starter 40W unit to a 100W workhorse exposes two entirely different business models:
- Purchase Price: Roughly $500 for a 40W entry tool versus $3,500+ for a 100W production engine.
- Production Speed: A 100W system cuts thick material batches in minutes, whereas a 40W takes hours.
- Tube Life: A 100W tube runs at lower stress, easily outlasting overworked smaller components.
Factoring these variables together calculates your “lifecycle cost,” or the true financial expense of running the equipment over time. Because heavy daily production usually requires a new $400 tube every two years, building that inevitable replacement into your retail prices early guarantees you stay profitable. With your business model firmly established, executing a safe deployment strategy becomes the final step to 100-watt success.
Conclusion: Your Action Plan for 100-Watt Success
Stepping confidently into professional-grade manufacturing requires mastering the delicate balance between active tube cooling, precise mirror alignment, and exact focal depths. A 100-watt laser transforms a concentrated beam of light into clean, glass-like cuts, but raw power is only part of the equation. This machine isn’t just a step up from a craft knife; it is an industrial engine capable of turning a workspace into a small business powerhouse.
Crossing the threshold into high-output creation requires a profound respect for the tool. Before you ever hit the laser igniter to fire that first test pulse, you must execute a strict ‘Day One’ safety and calibration audit. This is a Class 4 laser, capable of causing instant harm or starting fires if mishandled. Your audit must verify that your ventilation is pulling fumes completely outside, your protective eyewear is rated for your specific wavelength, and your industrial water chiller requirements are fully met to keep the system from overheating. Respect the power, and the machine will reward you with consistency.
To ensure your first experience is safe and successful, follow this 5-step checklist for your first week of ownership:
- Audit Your Space: Confirm you have dedicated electrical circuits, secure exhaust routing, and a fire extinguisher within arm’s reach.
- Dial In the Chiller: Connect and test your cooling system, ensuring the water temperature stays perfectly within the manufacturer’s safe zone before turning on the machine.
- Align the Optics: Take the time to meticulously pulse and adjust your mirrors until the beam hits dead center on the laser head.
- Run a Material Test: Create a simple grid on scrap wood to test different speeds and power settings, finding the sweet spot for your specific material.
- Cut Your First Prototype: Start with a simple 2D design, like a coaster or keychain, to practice focusing the lens and watching the cut quality.
You now understand the mechanics and safety protocols well enough to take that exciting first step. Try cutting a basic shape from scrap plywood and notice how adjusting your speed changes the smoothness of the edge. Each time you run a test cut and tweak your settings, you will build the confidence needed to tackle more ambitious designs. Prep your shop, respect the safety protocols, and prepare to transform your ideas into tangible reality.