
What is Hybrid Flooring?
Hybrid flooring is a revolutionary flooring solution that merges the resilience of vinyl with the elegant appeal of laminate. This combination results in a highly durable and visually appealing product, ideal for busy households. The innovative design of hybrid flooring allows it to withstand heavy foot traffic, making it perfect for high-usage areas like kitchens, hallways, and living rooms. Receive the Best information about hybrid flooring melbourne.
Advantages of Hybrid Flooring
One of the key advantages of hybrid flooring is its water-resistant properties, which make it suitable for areas prone to moisture such as bathrooms and laundry rooms. Unlike traditional hardwood, hybrid flooring does not swell or warp when exposed to water, ensuring longevity and easy maintenance. Moreover, hybrid flooring comes in a variety of styles and finishes, allowing homeowners to achieve a high-end look without the high-end price tag.
Hybrid Flooring Composition
Hybrid flooring typically consists of multiple layers, each serving a specific purpose. The top layer is a protective coating that resists scratches and dents, while the decorative layer underneath mimics the look of natural wood or stone. The core layer provides stability and is usually made from a combination of materials like limestone and PVC. This construction not only enhances durability but also provides a comfortable underfoot experience.
Preparing for Installation
Preparation is key to a successful hybrid flooring installation. Here are the preliminary steps you should take before starting the installation:
1. Assess the Subfloor
The condition of your subfloor is crucial for a successful installation. Ensure that it is clean, dry, and level. If you’re installing over tiles, check for any loose or damaged tiles that need to be fixed. It’s also important to remove any debris, as even small particles can affect the leveling of the flooring. Consider using a vacuum or broom to thoroughly clean the area before proceeding.
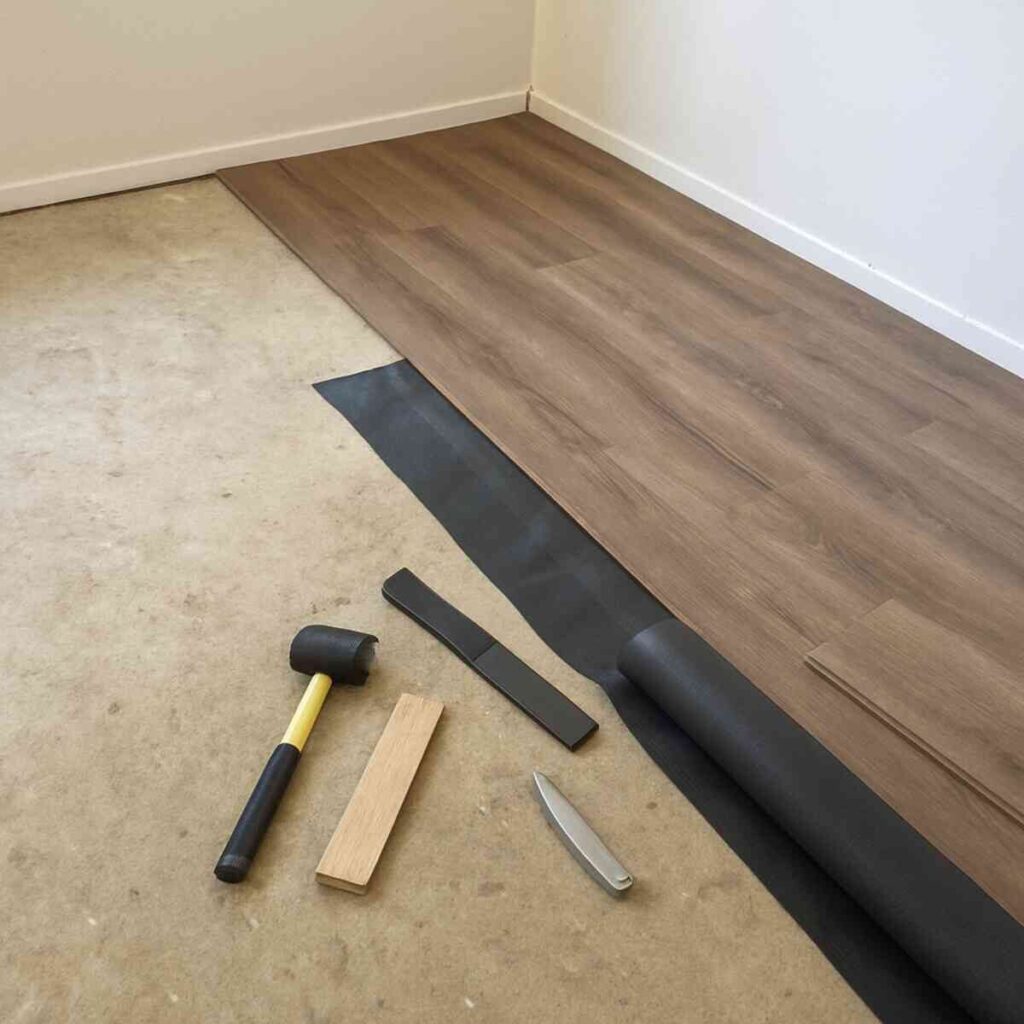
2. Gather the Necessary Tools
Having the right tools on hand will make the installation process much smoother. Here’s a list of essential tools you’ll need:
- Tape Measure: To ensure accurate measurements of the room dimensions.
- Utility Knife: For cutting planks to the desired length.
- Spacers: To maintain a consistent expansion gap.
- Rubber Mallet: For tapping planks into place.
- Pull Bar: Essential for fitting the last row of planks.
- Tapping Block: To join planks tightly without damage.
- Underlayment: Provides soundproofing and cushioning.
3. Check for Moisture Levels
Before installation, it’s critical to assess the moisture levels of the subfloor, particularly if the flooring is being installed in a basement or other moisture-prone area. Use a moisture meter to ensure the levels are within the acceptable range for hybrid flooring. This step can prevent future issues such as mold growth or warping, ensuring the longevity of your floor.
4. Plan Your Timeline
Consider the timeline for your project, keeping in mind that rushing can lead to mistakes. Allocate enough time for each stage, from preparation to acclimation to installation. Be sure to account for potential delays, such as waiting for adhesive to dry if used. Planning your timeline carefully can help you avoid unnecessary stress and ensure a smoother installation process.
Essential Tools for Hybrid Flooring Installation
1. Tape Measure
A tape measure is essential for accurately measuring the room dimensions and ensuring that your flooring planks are cut to the correct size. Accurate measurements will help minimize waste and ensure a professional finish. It’s advisable to measure twice before cutting to avoid mistakes that could lead to wasted materials and increased costs.
2. Utility Knife
A sharp utility knife is crucial for cutting the planks to the desired length. Hybrid flooring is generally easy to cut, but a precise cut is necessary for a seamless look. Ensure your utility knife has a fresh blade to make clean cuts and reduce the risk of damaging the planks. A sturdy cutting surface will also help achieve a precise cut.
3. Spacers
Spacers are used to maintain a consistent expansion gap around the perimeter of the room. This gap allows the flooring to expand and contract with changes in temperature and humidity. Without this gap, the flooring could buckle or warp over time. It’s important to use spacers consistently around the room to maintain uniformity and ensure the flooring remains in optimal condition.
4. Rubber Mallet
A rubber mallet is useful for tapping the planks into place without damaging them. This tool helps to ensure that the planks fit snugly together. The rubber head of the mallet provides enough force to secure the planks while protecting their surface from dents or scratches. Using a mallet in combination with a tapping block can help achieve a tight, seamless fit.
5. Pull Bar
A pull bar is an indispensable tool for installing the last row of planks, as it helps to pull the planks tightly together where a tapping block might not fit. Its design allows you to reach into tight spaces and apply the necessary force to secure the planks. This tool is especially helpful in ensuring a tight fit around walls and obstacles, contributing to a polished final appearance.
6. Tapping Block
A tapping block is used to join the planks together tightly. It prevents damage to the edges of the planks while ensuring a snug fit. When using a tapping block, it’s important to position it correctly and tap gently but firmly to avoid damaging the flooring. This tool is essential for achieving a seamless, professional finish in your flooring installation.
7. Underlayment
While not always necessary, an underlayment can provide additional soundproofing and cushioning, and it can also help to smooth out minor imperfections in the subfloor. Choosing the right underlayment can enhance the comfort and acoustics of the room, making it a worthwhile investment for many installations. It’s important to select an underlayment that is compatible with your specific type of hybrid flooring to maximize its benefits.
Additional Tools and Materials
1. Saw
Depending on the thickness of your hybrid flooring, you might need a saw for more precise cuts. A jigsaw or circular saw can be particularly useful for cutting around obstacles like door frames and vents. When using a saw, ensure you have the proper blade for the material to achieve clean, precise cuts. Always prioritize safety by wearing protective gear and following the manufacturer’s instructions.
2. Level
A level is important for checking that your subfloor is even. An uneven subfloor can lead to an unstable flooring surface, which may cause problems down the road. Using a long level can help identify dips or high spots that need to be addressed before installation. Addressing these issues beforehand ensures a stable, long-lasting flooring installation.
3. Pencil or Chalk
These are necessary for marking the planks where they need to be cut. A clear, visible mark will help ensure an accurate cut. Using a pencil or chalk allows for easy correction of mistakes, ensuring that your cuts are as precise as possible. Consistent marking helps maintain accuracy throughout the installation process, reducing errors and waste.
4. Safety Gear
Safety should always be a priority. Wear safety goggles and gloves to protect yourself from dust and sharp edges during the installation process. Ensuring proper ventilation in the workspace can also help reduce the risk of inhaling dust or fumes. Adhering to safety protocols not only protects you but also contributes to a more efficient and stress-free installation experience.
5. Adhesive and Sealant
While many hybrid flooring options feature a click-and-lock system, some installations may benefit from adhesive or sealant to secure the flooring further. Adhesives can be useful in high-moisture areas or for added stability. Sealants can protect the edges of the planks, especially in areas prone to spills or water exposure, enhancing the longevity of your flooring.
Installation Tips for Hybrid Flooring
1. Acclimate the Flooring
Before installation, let the hybrid flooring acclimate to the room’s temperature and humidity for at least 48 hours. This will help prevent any expansion or contraction after the installation. Acclimation allows the planks to adjust to the environment, reducing the risk of buckling or gapping. Place the planks in the room where they will be installed, laying them flat and spreading them out if possible.
2. Plan Your Layout
Plan the layout of the planks before you start installing them. Consider starting from the longest wall and working your way across the room. This can help make the installation more efficient and aesthetically pleasing. Visualize the placement of each plank, factoring in potential obstacles like doorways and vents, to ensure a seamless and attractive final result.
3. Stagger the Planks
Stagger the end joints of the planks to create a more natural look and enhance the structural integrity of the flooring. Aim for a minimum stagger of 6 inches between adjacent rows. This technique not only improves the visual appeal but also helps distribute weight and pressure across the floor, preventing weak spots. Careful staggering contributes to the durability and lifespan of your flooring.
4. Check for Moisture
If you’re installing hybrid flooring in a moisture-prone area, consider using a moisture barrier to protect against potential water damage. Moisture barriers can prevent water from seeping into the subfloor, minimizing the risk of mold and mildew. This precaution is particularly important in basements, bathrooms, and kitchens, where moisture levels are typically higher.
5. Address Door Jambs and Trims
When installing hybrid flooring, it’s essential to address door jambs and trims to ensure a seamless fit. Undercutting door frames and trims allows the flooring to slide underneath, creating a clean and professional look. Use a piece of flooring to gauge the correct height for undercutting, ensuring the planks fit snugly beneath the door jambs for a polished finish.
Final Thoughts
Hybrid flooring installation can be a rewarding DIY project with the right tools and preparation. By ensuring you have the essential tools on hand and following these installation tips, you can achieve a professional-looking finish that will enhance the beauty and functionality of your home for years to come.
Remember, careful planning and attention to detail are key components of a successful hybrid flooring installation. With patience and the right approach, you’ll be able to transform your space with ease and confidence. Investing time in preparation and understanding each step of the process can significantly impact the quality of your installation, leading to a durable and aesthetically pleasing result.